HIPAA 5010’s Impact on Provider Designations
As of January 1, 2012, the United States Department of Health and Human Services (HHS) has mandated that healthcare providers and payors adopt the new HIPAA 5010 standard for all electronic transactions, which includes eligibility requests, claims, remittances and referrals. The purpose of this new standard is to achieve a uniform industry platform for all electronic transactions that is more accurate, efficient and secure than the old standard.
HIPAA 5010 enforcement begins July 1, 2012. Hopefully by now you’re aware of the need to update your provider ZIP Code to the ZIP+4 format and discontinue the use of legacy IDs in favor of your NPI number. These are some of the more easy-to-understand requirements in the HIPAA 5010 standards—the provider designations in Dentrix that involve Rendering Provider, Billing Provider and Pay-To Provider may not be as clear, however, and deserve some additional clarification.
A change in provider designations
There are a few rules to understand about these provider designations:
- The Billing Provider address can no longer be a P.O. box or lockbox. Instead, this field must contain the street address of the location where services were rendered.
- The Rendering Provider is the provider that performed the services.
- The Pay-To Provider is where you want payments sent.
- If you’re not using a P.O. box or lockbox, and your Billing Provider and Pay-To Provider addresses are the same, no changes are needed for this requirement.
- If you want your payments sent to a P.O. box or lockbox, you can still do this; you just can’t specify this address as the Billing Provider. Instead, you now need to specify the P.O. box address with the Pay-To Provider, as shown here:
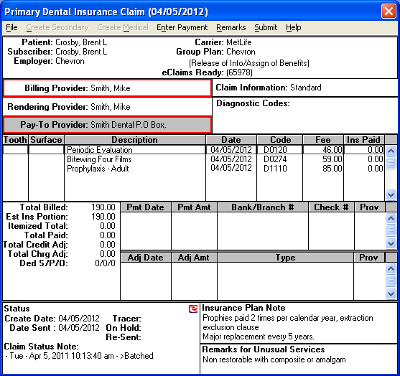
The Pay-To Provider address should reflect where payors need to send payments, and it can be either a P.O. box or street address.
You can create Pay-To Provider addresses in the Office Manager:
- From the Maintenance menu, point to Practice Setup, then click Practice Resource Setup.
- In the Practice Resource Setup dialog box, click New to create a new Pay-To Provider or select a provider and click Edit to edit an existing provider.
- In the Provider Information dialog box, specify the address for the Pay-To Provider (either a street address or P.O. box where payors need to send payments) and click OK, then Close.
- To designate this provider as the Pay-To Provider, from the Ledger Transaction Log, double-click a claim.
- In the Dental Insurance Claim window, double-click the Billing Provider.
- In the Select Provider dialog box, make sure the provider you select is one who has a street address defined in Practice Resource Setup, and click OK.
- Now double-click the Pay-To Provider.
- In the Select Provider dialog box, select the provider to whom payors need to send their payments, and click OK.
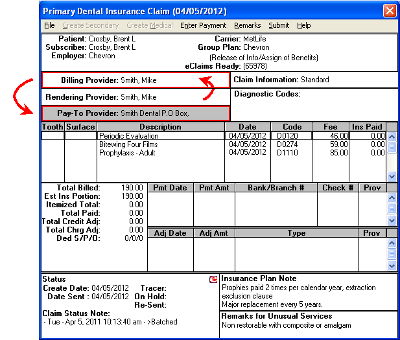
The screen below shows a simple summary of how this 5010 change affects the providers you specify in the Dentrix Ledger when you send electronic claims:
As the most-used electronic patient chart, Dentrix is helping more dentists make the move to a chartless practice than any other practice management software. If your office hasn’t yet gone chartless, here are some motivating reasons to start.
- The old Billing Provider address for paper claims becomes the new Pay-To Provider address for electronic claims.
-
The old Rendering Provider address for paper claims (which required a street address) becomes the new Billing Provider address for electronic claims.

If you regularly send electronic claims, you’ll want to set up your practice defaults to use the correct providers for electronic claims. To do this, in the Office Manager from the Maintenance menu, point to Practice Setup and then click Practice Defaults to display the Practice Defaults dialog box.
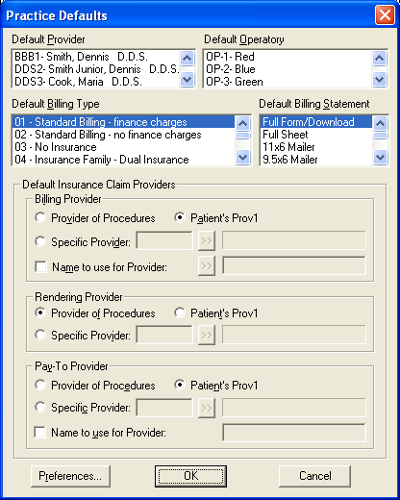
Make sure the Billing Provider you specify in the Practice Defaults dialog box has a street address, not a P.O. box. Make sure the Pay-To Provider you specify is the provider where you want payments to be sent. When finished, click OK.
How this applies to different practice organizations
The following examples describe common billing scenarios and how providers should be designated in Dentrix for each scenario:
- Single location, one provider - For the typical single-location practice with one provider that does not provide services at other locations, the setup is fairly simple. The Billing Provider must use the practice’s street address; the Rendering Provider is the practice’s sole provider; and the Pay-To Provider uses either the practice’s street address or a P.O. box, whichever is preferred. You can set these up as defaults in the Practice Defaults dialog box.
- Single location, multiple providers - In a single location with multiple providers that bill and manage payments separately from one another, in the Practice Defaults dialog box, the Billing Provider and Rendering Provider should both have the Provider of Procedures option selected. However, if all receivables are managed by one provider, such as the practice owner, under Billing Provider, select Specific Provider and designate the provider who manages receivables. Under Pay-To Provider, select Specific Provider and choose the provider whose address designates where payment should be remitted.
- Centralized billing - In this scenario, in the Practice Defaults dialog box, for the Billing Provider, select Specify Provider and specify a corporate entity or single dentist. (This provider must be set up with the street address where procedures were rendered and the type 2 NPI and TIN that is registered with the payors for the billing provider.) The Pay-To Provider, however, can be the central office where payments are sent. You may need to create a new provider to designate as the Pay-To Provider in this situation.
Overriding electronic claims defaults to send paper claims
Now that you have set up your electronic claim defaults, what if you need to send a paper claim to a payor that doesn’t accept electronic claims? Simply revert to the provider designations you used previously for paper claims:
- From the Ledger Transaction Log, double-click a claim.
-
In the Dental Insurance Claim window, double-click the Billing Provider.
- In the Select Provider dialog box, specify the provider who will receive transactions (for paper claims, this can be either a street address or a P.O. box.) Click OK.
- Now double-click the Rendering Provider.
- In the Select Provider dialog box, select the provider who performed the services that are being billed (this provider must have a street address). Click OK.
These changes in provider designations will help you comply with the new HIPAA 5010 standards as you process both electronic and paper claims. Remember, failure to make these changes could result in rejected claims or misdirected claim payments. For help implementing these changes, contact eServices support at 800-734-5561.
Author: Roger Gagon & Damon Graves
Published: 05/26/2012

 Contact Us
 Phone:
  Email
Email Request Demo