Generating a List of Patients Due for Continuing Care
One of the best ways to keep your schedule full is to schedule patients for regular continuing care appointments. To help you with that goal, you can use the Continuing Care module to set up a view that displays a list of patients who are due for continuing care, but do not have an appointment. That way, you can use the list to call patients and remind them of that they need to schedule an appointment.
 1. From the Appointment Book, open the Continuing Care module.
2. In the Continuing Care module, select Views | Setup. The Continuing Care Views Setup dialog appears.
3. Click New. The New Continuing Care View dialog appears.
4. Enter a View Name.
5. In the Type drop-down, select the desired option and mark With CC to find patients attached to the type selected or mark Without CC to find patients not attached to the type selected.
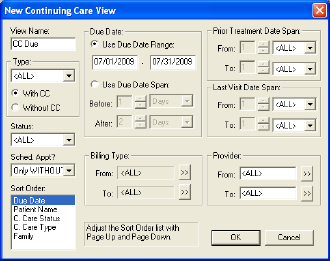 6. In the Sched. Appt? drop-down, select ONLY WITHOUT.
7. Change the sort order, if desired, by selecting the order by which you want to sort the list and pressing Page Up until the order is at the top of the list.
8. In the Due Date group box, you have the option of using a due date range or a due date span.
- If you mark Use Due Date Range, you can enter an exact date range that DENTRIX uses to find patients. For example, if you enter the dates, January 1, 2008 to January 31, 2008, DENTRIX generates a list of all patients due in January.
- If you mark Use Due Date Span, you can enter conditions, according to today’s date, that DENTRIX uses to find patients. For example, if you set the span as Before 1 Days and After 1 Months and today’s date is January 1, 2008, DENTRIX generates a list of all patients due between December 31, 2007 and February 1, 2008.Click OK to save your patient education topic.
9. In the Billing Type group box, select the billing type range to include/exclude certain categories of patients based on billing types. If you want to include all billing types, leave the From and To fields set to
10. In the Provider group box, select the provider range to include one or more providers on the report. If you want to include all providers, leave the From and To fields set to
11. Click OK to return to the Continuing Care Views Setup dialog.
12. Click Close to return to the Continuing Care module.
Don't miss the opportunity to enhance your DENTRIX experience and continue to create your practice's future success.
Author:
Published: 08/07/2009

 Contact Us
 Phone:
  Email
Email Request Demo