Sending Attachments with Electronic Claims
It happens more often than you’d like: You provide treatment to a patient but when you bill the insurance, the claim gets rejected. Why? Because the insurance carrier wants proof that the treatment was necessary. It’s not a big deal to provide the proof; you have X-rays and treatment notes that explain why the treatment was required. But now you have to pull all of that information together, resubmit the claim and then wait for the claim to be processed—again!
Wouldn’t you like to skip right to getting paid?
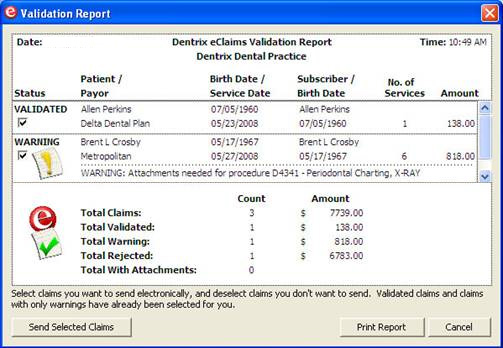
Dentrix and eClaims make this easy. The eClaims software automatically checks whether or not a carrier requires attachments. When you try to submit a claim for a procedure needing an attachment, the eClaims Validation Report warns you before the claim is sent.
Once you know you need to include an attachment, Dentrix allows you to include digital documentation along with the electronic claim. You can attach digital X-rays, perio charts, photos and more. This will save you the cost of printing and mailing materials, but more importantly it means your office gets paid faster and you don’t have to submit a claim twice.
To select attachments and send them electronically:
- From the Ledger, select the patient and then open the insurance claim for which you want to add an attachment.
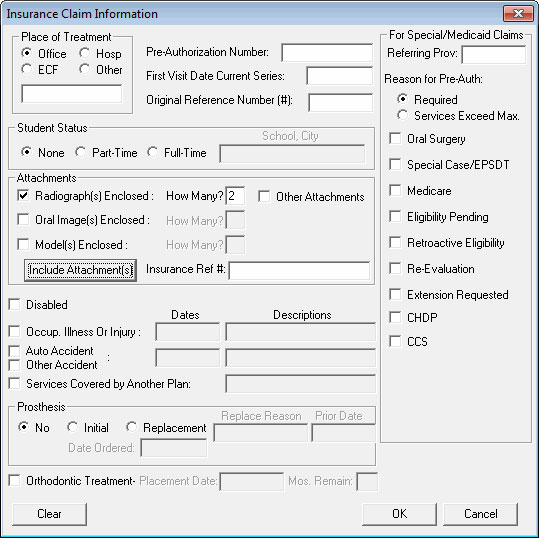
- Double-click the Insurance Claim Information box.
- From the Insurance Claim Information dialog box, in the Attachments group, select the type(s) of documents you’ll be attaching to the claim. Enter how many of each kind of attachment you are including. Click the Include Attachment(s) button.
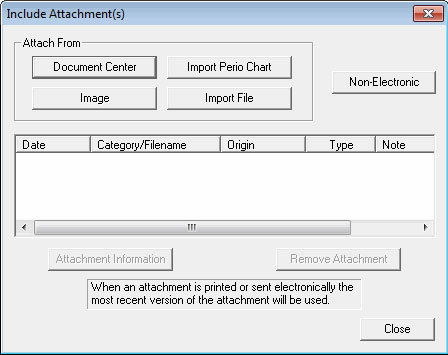
- From the Include Attachment(s) dialog box, select the document(s) you want to attach. You can include materials from the Document Center, perio exams from the Perio Chart, images stored in Dexis or even text files stored on your computer.
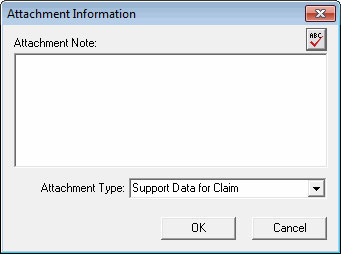
- If desired, click the Attachment Information button to add a note or to change the attachment type.
- Click Close to save your changes and return to the Insurance Claim Information dialog box.
- Finish the process by sending the claim to the batch to be submitted with your other insurance claims at the end of the day.
At present, not all insurance carriers accept electronic attachments, but you can form the habit of attaching documentation to all your electronic claims now. When new carriers are added, you’ll have given them all the information they need to pay you in full on the first claim submission.
For more information about sending attachments with a claim, log in to the Dentrix Resource Center and view article 23778 or see the "Sending Attachments with a Claim" section in the Ledger chapter of the Dentrix G4 User’s Guide. For more information about electronic claims, watch the eClaims tutorial. To find out how you can begin sending claims electronically, visit www.dentrix.com/products/eservices/eclaims/.
Author: May Wescott
Published: 04/29/2011

 Contact Us
 Phone:
  Email
Email Request Demo