Reduce Rejections with Complete Claims
Making sure that all necessary information is complete on an insurance claim form is a vital part of maximizing claim acceptance. The indication that a patient is beginning orthodontic treatment or that there was a pre-authorization on a procedure can mean the difference between a check in the mail and a claim rejection. You can speed up payment on claims by making sure you've reported important claim information with your first submission.
Dentrix allows you to edit claim information prior to printing or electronic submission. By editing claim information, you can ensure that you have submitted all the necessary information and that the information is clear and legible.
To create the claim and include necessary information:
- Select the procedures in the patient's Ledger and click Insurance > Selected Procedures. The Primary Dental Insurance Claim window appears.
- Double-click the Claim Information block. The Insurance Claim Information dialog box appears.
-
Add claim information to the following areas in the Insurance Claim Information dialog box:
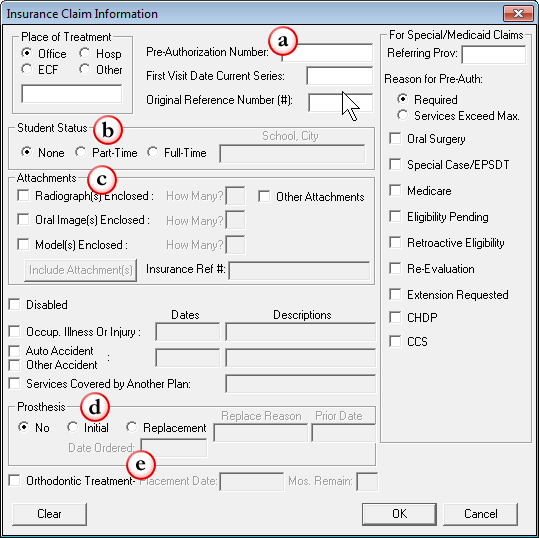
- Pre-Authorization Number - If required, type the pre-authorization number provided by the patient's insurance carrier.
Note: If you have already posted a pre-authorization in Dentrix for the claim procedures, the pre-authorization number automatically appears in this field. Additionally, if there is more than one pre-authorization number for the procedures on the claim, Dentrix will create separate claims for each pre-authorization number. - Student Status - Select the appropriate status for the patient. If the patient is a part-time or full-time student, enter the name of the school and the city location in the text box.
Note: The 2012 ADA claim form no longer includes this information; however, it will continue to print on previous claim formats. - Attachments - If you are sending attachments with the claim, select the appropriate type(s) and enter the number of attachments in the text boxes.
- Prosthesis - If the claim involves a prosthesis, select the appropriate option and enter the Replace Reason, Prior Date and Date Ordered.
- Orthodontic Treatment - If the claim is for orthodontic treatment, select this option and enter the Placement Date and Mos. Remain (months remaining) to complete the treatment.
- Pre-Authorization Number - If required, type the pre-authorization number provided by the patient's insurance carrier.
- Click OK to save your changes and return to the Primary Dental Insurance Claim window.

Note: Dentrix automatically pulls any claim information that you've set for the primary dental insurance claim into any related claims, such as secondary or medical insurance claims. However, any changes you make while editing the primary dental insurance claim will only apply to this claim and its related claims. When you create a new claim, the patient's defaults will be used to create the new claim.
By taking the time to use the various fields in the Insurance Claim Information dialog box, you can avoid having the claim returned or rejected because information is missing, incomplete or unclear.
For more information about how to add or edit insurance claim information, see the "Changing claim information" topic in Dentrix Help or view the "Claims Management" webinar recording found under the On-Demand Training tab in the Dentrix Resource Center.
Author: Sean Eyring
Published: 03/31/2013

 Contact Us
 Phone:
  Email
Email Request Demo