Get Your Schedule Ready for the New Year
It’s the start of a new year! One of the first things you’ll want to do is make sure you get your practice schedule set up now, blocking off time for vacations, holidays and times you know you’ll be closed. It’s better to do that now, at the first of the year, before appointments get scheduled on those dates and you have more work to do to get them rescheduled.
This month’s tip will talk about two different ways you can go about setting up your schedule: closing the entire office on selected days and closing individual operatories on selected days.
Closing the Office
When the entire office is closed for a holiday or other event, instead of just blocking off the operatories in the schedule, the best thing to do is to close the office on that day in the Appointment Book. If you leave the office open and just block out time, the day will still be counted as available time on your reports and your weekly and hourly production totals will be lower than they should be. When you close the day in the Appointment Book, the day will be grayed out and will give you a warning that the office is closed if you try to schedule something on that day.
To close the office on a selected day:
- From the Appointment Book, click Setup > Practice Schedule. The Schedule Calendar for Practice dialog box appears.
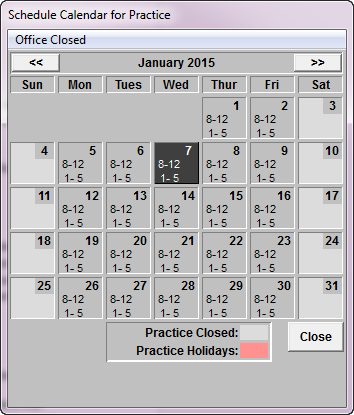
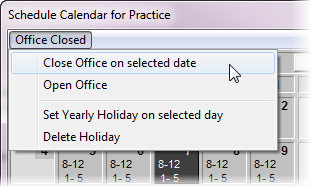
- Select the day the office will be closed and click the Office Closed button. From the drop-down list of options that appears, click Close Office on selected date. The practice hours will be removed from the day on the calendar, and it will turn gray. The day will also be blocked in the Appointment Book.
- Click Close to return to the Appointment Book.
You’ll want to follow the above steps for holidays that have a different date each year (such as Thanksgiving or Memorial Day). For holidays that occur on the same date each year, such as Christmas or 4th of July, when you click the Office Closed button, click Set Yearly Holiday on selected day. This will close the practice every year on that date.
Closing Operatories
Occasionally, you will need to close an operatory for a day, but the rest of the office needs to remain open. You can use the Schedule Event tool to close an operatory for an entire day and block it out on your schedule without adjusting the practice schedule or provider schedules.
To close an operatory:
- From the Appointment Book, click File > Schedule Event. The Schedule Event dialog box appears.
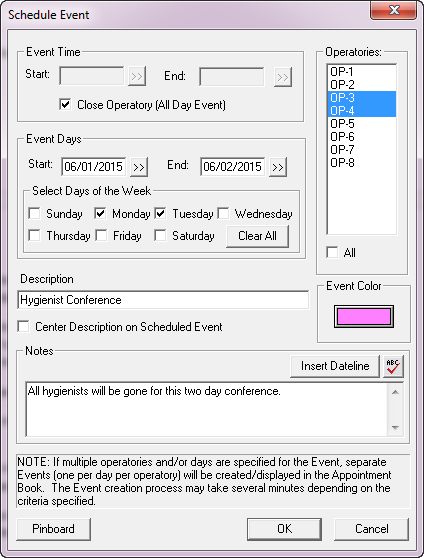
- In the Event Time group box, enter the time during the day you want the operatory to be closed in the Start and End fields, or check Close Operatory (All Day Event) to close the operatory for an entire day.
- In the Event Days group box, select the Start and End date range you want to close the operatory, and select the days of the week to close. For example, if you wanted to close the operatory every Wednesday in June, enter 06/01/2015 in the Start field and 06/30/2015 in the End field, and check the Wednesday box.
- Select affected Operatories, enter a Description for the event, select an Event Color and add any necessary Notes in the fields provided.
- Click Pinboard to move the event to the Pinboard, or click OK to close the operatory at the date and time you entered.
Getting your yearly schedule set up now when the year has just begun will save you the headache of having to reschedule appointments later or having to try and plan vacation and holiday hours around what’s already in the Appointment Book.
For more information about setting up holidays in Dentrix, visit the Dentrix Resource Center at www.dentrix.com/resource-center and see the Yearly Holidays knowledgebase article (#19704), or view the Changing Schedule Hours article in the Dentrix Help.
Author: Sean Eyring, Curriculum Development Specialist
Published: 01/31/2015

 Contact Us
 Phone:
  Email
Email Request Demo