Fee Schedule Setup
The Automatic Fee Schedule Changes utility can be used to increase or decrease an entire fee schedule rather than changing one fee at a time. For example, you would use the Automatic Fee Schedule Changes utility if you want to increase your fees by five percent, increase only the restorative fees to cover increased lab costs, or create a discount fee schedule for family and friends. To use the Automatic Fee Schedule Changes utility:
1. In the Office Manager, select Maintenance | Practice Setup | Auto Fee Schedule Changes. The Automatic Fee Schedule Changes dialog appears. 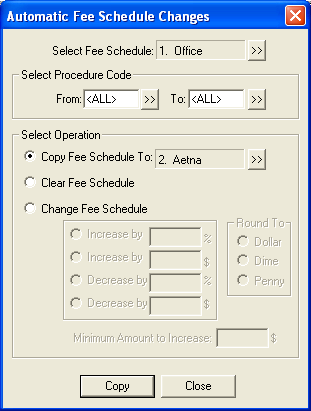
2. Select the fee schedule you want to change by clicking the Select Fee Schedule search button.
3. Select the desired procedure code range.
4. In the Select Operation group box, mark the operation you want to use to change the fee schedule:
- Copy Fee Schedule To allows you to copy the selected fee schedule to the fee schedule selected for this operation.
- Clear Fee Schedule allows you to make each amount in the selected fee schedule $0.
- Change Fee Schedule allows you to increase or decrease the selected fee schedule by a dollar amount or a percentage.
5. Click Copy/Clear/Change, depending on the operation selected in step 4. The Automatic Fee Schedule Change Results dialog appears. 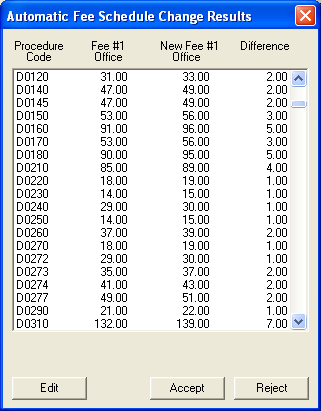
6. Make changes to the individual fees:
- Double click the procedure amount to change.
- Enter the new amount.
- Press Tab to advance to the next procedure.
- Repeat steps b – c for all procedures that need to be changed.
- Click the Accept Change button.
7. Click Accept to return to the Automatic Fee Schedule Changes dialog.
8. Click Close to return to the Office Manager.
To learn more about updating treatment plan fees, please read the Updating Treatment Plan Fees article from a past issue of the Dentrix Enewsletter.
Author:
Published: 04/07/2009

 Contact Us
 Phone:
  Email
Email Request Demo