Patient and Family Info—All In One Place
Picture this: You come into your office on a Monday morning and listen to your voicemail. One of your patients wants you to call them back, but doesn’t give any indication what they want to talk about. It could be about a recent bill, it could be to reschedule an appointment, it could be a question about when they are due for their next cleaning. Since you don’t know what they want, it’s difficult to prepare for the phone call. There is one place in Dentrix, however, that you should use as your jumping-off point for the phone call: the More Information window.
The More Information window displays a wealth of patient information all in one place, which means you don’t have to open several different modules to find the data you need. From the More Information window, you can view patient contact information, family members, upcoming appointments, appointment history, continuing care due dates and balance/aging information.
You can access the More Information window from the Select Patient dialog box or from any Dentrix module where you can select a patient.
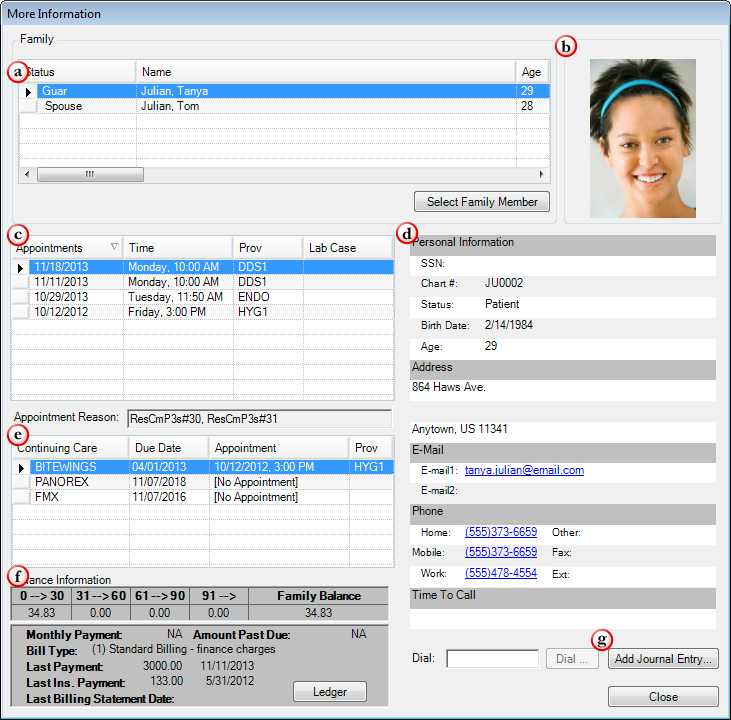
Within the More Information dialog box, you can access the following information:
| a. | Family – All members of the family are displayed. You can switch between family members by clicking on the family member’s name. You can double-click on a name to open that patient’s Family File. |
| b. | Picture – If you have attached a patient picture to the patient’s record, the picture will be displayed here. |
| c. | Appointments – The selected patient’s future and past appointments are shown. The Appointment Reason of the selected appointment is displayed below the appointment list. To open the Appointment Book to the day of the appointment, double-click an appointment. |
| d. | Personal Information – The selected patient’s personal information is displayed, including Social Security number, chart number, patient status, birth date, age and address. The patient’s email address is displayed and can be used to compose an email message to the patient. Click the email link to open a new message window if you have a MAPI-compliant email service set up. All phone numbers for the patient are displayed, along with the best time to call the patient (as indicated in the Patient Information dialog box.) |
| e. | Continuing Care – The continuing care type(s) attached to the selected patient are shown. To manage the selected patient’s continuing care, double-click a continuing care type. |
| f. | Balance Information – The aged balance and family balance of the account, payment agreement information, billing type, payment information and date of the last billing statement are displayed. To open the selected patient’s ledger, click Ledger. |
| g. | Add Journal Entry – Use this option to add an entry to the selected patient’s Office Journal. |
The next time you are talking with a patient either on the phone or over the counter, consider using the More Information window as your source of information. Chances are good that this screen will contain the information you need.
Author: Sean Eyring, Curriculum Development Specialist
Published: 03/31/2015

 Contact Us
 Phone:
  Email
Email Request Demo