New Dentrix G6 Document Center Features
Dentrix G6 includes an auto-acquire feature in the Document Center that makes it easier for you to store and organize the documents you scan.
Automatically Import Documents into the Document Center
The new auto file acquire feature allows you to designate a folder on your computer or network drive where you can save images and documents that will be automatically added to the Document Center. You can make this folder the destination that your scanner scans documents into, or it could be a folder where you save patient files that you want to store in Dentrix. You can acquire the following document types to the Document Center: .pdf, .doc, .docx, .xls, .ppt, .bmp, .gif, .jpg, .png, .txt and .rtf.
To set up auto file acquire:
- From the Document Center, click Setup > Acquisition Method Defaults. The Setup Acquisition Method Defaults dialog box appears.
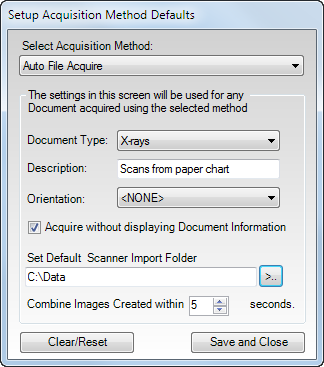
Note: If you have never set up automatic file acquisition, when you open the Document Center you will receive a message asking if you want to set it up. - Select Auto File Acquire from the Select Acquisition Method drop-down menu.
- In the Document Type field, specify the default document type you want to be assigned to the documents when they are imported.
- In the Description field, type the default description text you want to be assigned to the documents when they are imported.
- If you will be scanning X-rays, in the Orientation field, specify the default orientation of the image in the mouth.
- If you want the document information you have just set up to be assigned automatically, check Acquire without displaying Document Information. If you want the document information window to appear for each document, allowing you to make changes on a document-by-document basis, leave that option unchecked.
- Click the search button in the Set Default Scanner Import Folder field and select the folder where you will save files. Files added to this folder will be automatically imported to the Document Center.
- If you want images to be combined into one Document Center file when they are imported into the folder within a short amount of time of each other, specify the amount of time in the Combine Images Created within field.
- Click Save and Close.

If you have the Document Center open and a patient selected when you add a document to the default scanner import folder, the document will be added to the selected patient with the default information you specified. If a document is added to that folder while the Document Center is closed, the file will be added to the Unfiled Documents folder.
The auto-acquire feature in the Document Center and other new features in Dentrix G6 are part of the “What’s New in Dentrix G6” course offered at this year’s Business of Dentistry Conference. Visit www.businessofdentistry.com for more information on how to register.
Author: Sean Eyring, Curriculum Development Specialist
Published: 09/30/2015

 Contact Us
 Phone:
  Email
Email Request Demo