Verify Billing Statements Before Sending Them
Dentrix QuickBill gives you all the control of producing billing statements manually, but without all the hassle. With just a few clicks in Dentrix, you can send billing statements to the patients of your choice.
When you use QuickBill, you will generate your billing statements in Dentrix as you have normally done. However, instead of printing to review and mail them, you’ll review them electronically and then send them to the QuickBill clearinghouse where they will be printed and mailed for you.
To generate billing statements using QuickBill:
- In the Office Manager, select Reports > Billing. The Billing Statements dialog box appears.
- Select your desired statement options.
- In the Statements group box, click Send Electronically, then click OK to send the report to the Dentrix Print window for verification.
Note: Check Save As Default to save these settings if you want to use them every time you send statements electronically. - From the Dentrix Print window, you can preview each bill that will be sent. Use the left and right arrows to navigate in the preview window. If you would like to remove a statement from the statement transmission, uncheck the Send Statement To option while viewing it. The bill preview turns gray, indicating that the displayed bill will not be sent.
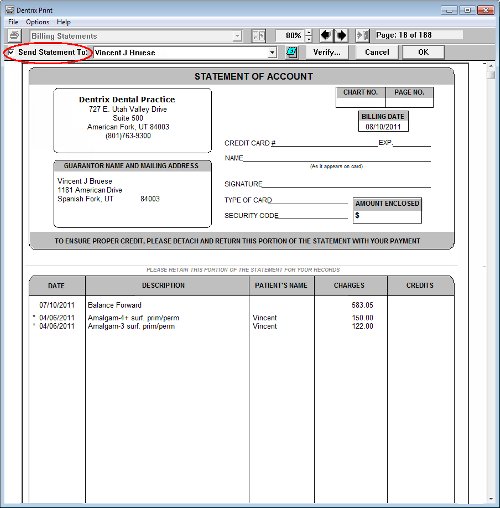
- Click the Verify button to see a list of all accounts for which bills were generated. Statements will be sent to the accounts that are highlighted in the list. You can remove accounts from the statement transmission by clicking on a name. The highlight will disappear, indicating that the bill will not be sent. Click OK to return to the Dentrix Print window.

- Click OK to submit bills electronically. The QuickBill Additional Services dialog box appears. Click Send Statements button. The Sending Statements dialog box appears, showing the progress of the transmission. When the transmission is complete, a message lets you know that all statements have been sent.
Note: If you’d like to include a patient newsletter with your bills (additional fees apply), click the Include Patient Newsletter option and select a newsletter from the drop-down menu.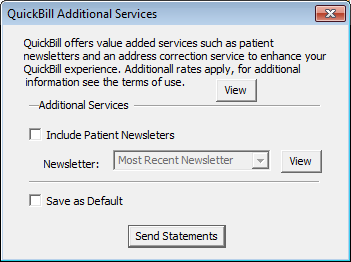


Enabling Billing Statement Verification
Whether you are going to submit your billing statements to QuickBill electronically or print them out and mail them manually, you can preview each statement prior to sending it by enabling the Verify Billing Statements to Send option. You should make sure that this option is set up on each workstation that will process bills.
To enable this option:
- From the Office Manager, select Maintenance > Practice Setup > Preferences. Click the Print Options tab.
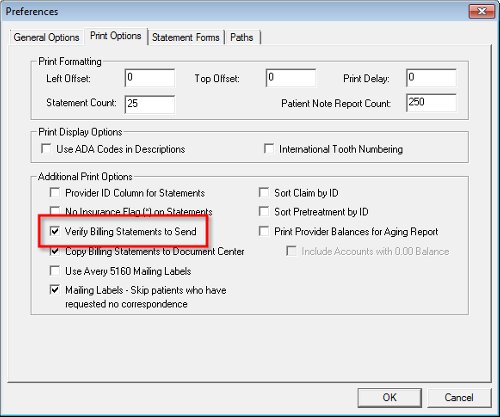
- Check the box next to Verify Billing Statements to Send.
- Click OK.

For more information about using QuickBill, log in to the Dentrix Resource Center and search for article #58054 Sending Electronic Billing Statements, to download the getting started guide, view video demonstrations and find a link to a recorded webinar. For more information about generating billing statements, see the Generating Billing Statements topic in the Dentrix Help section.
Author: Sean Eyring / Erin Brisk
Published: 08/30/2012

 Contact Us
 Phone:
  Email
Email Request Demo