When Patients Leave the Practice
Every practice loses patients. They leave for college, get divorced, move way, pass away and—worst case—change providers. To keep your patient database up-to-date, relevant and producing meaningful reports, you must act appropriately when you determine that a patient has left the practice. And your response must be guided not only by the needs of the practice, but also by the legal requirements in your state for the handling of electronic records.
We can’t advise you on the legal requirements for your state, but we can provide you with several options in Dentrix to best manage your electronic patient records when a patient leaves the practice.
Changing a Patient Status to Inactive
When is a patient no longer active? You decide. Many practices consider a patient inactive when they have not been seen in over a year. On one hand, this is a great opportunity for reactivation efforts. But when you get to the point where you’ve reached out repeatedly without success, it may be time to inactivate the patient.
When you inactivate a patient, the patient record remains unchanged in Dentrix except that it has been tagged with a status you can filter. For example, there are certain reports (such as the Continuing Care list) that do not include inactive patients. Inactive patients continue to appear in the Select Patient dialog box and you can schedule appointments for them and post treatment to the Chart or Ledger. Inactive patients can still be subscribers to an insurance plan and can be the responsible party for an account (head-of-house).
Changing a Patient Status to Non-Patient
When a patient informs you that he will no longer be seen at the practice, but other members of the family are still active patients, then you should change that patient’s status to Non-Patient. Like inactivation, when you change a status to Non-Patient the patient record remains unchanged in Dentrix.
Because a patient with a non-patient status can still be an insurance subscriber and a head-of-house, there are certain reports in which they will still be included. Reports that list non-patients include the Aging Report, Billing Statements, Day Sheet, Insurance Aging Report, Procedures Not Attached to Insurance and more.
Changing a Patient Status to Archived
When you determine that a patient will no longer be coming to the practice, you should change the patient status to Archived. Archiving patients simplifies your database and makes selecting patients faster and easier. However, Dentrix applies some rules to protect the integrity of the database. For example, you cannot archive patients with future due payment plans or outstanding insurance claims. Patients cannot be archived who are subscribers to an insurance plan for other family members. And guarantors cannot be archived until you archive all other family members and he or she does not have a payment agreement or a balance.
When you archive a patient, the following occurs:
- Any future appointments for that patient are deleted from the Appointment Book.
Note: Past appointments remain in the Appointment Book, and the appointment will have an {A} next to the patient name. - A note appears in the archived patient’s Office Journal for the deleted appointments, with the date, time, provider and reason the appointment was deleted.
- Dentrix deletes all continuing care, employer, insurance and referral information and adds it to the Patient Note. You can view this information after you archive the patient.
- All addresses, procedures, insurance claims, payments, adjustments, medical alerts, prescriptions, patient questionnaires and periodontal exams remain intact.
- Dentrix will not allow you to edit a patient’s information as long as the patient is archived.
- Archived patients do not appear in the Select Patient dialog box unless you select Include Archived Patients.
- When archived patients appear on a report or in a module, <Archived> or <A> appears in front of their name.
To change the status of a patient:
- From the Family File, select the patient.
-
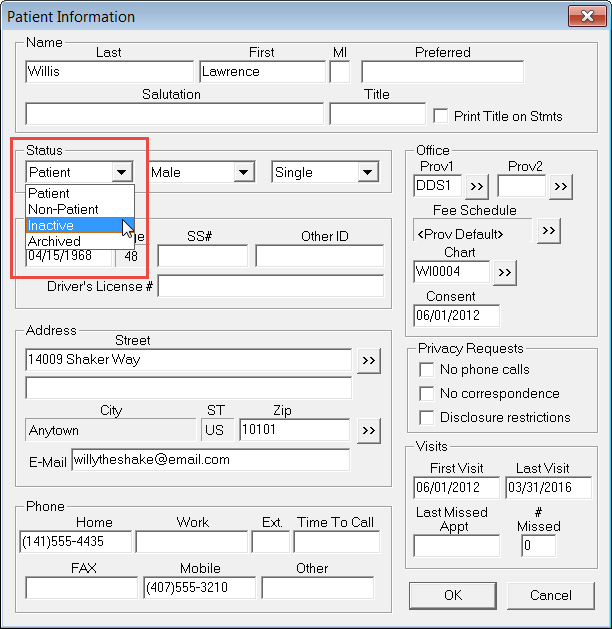
Double-click on the Patient Information block. The Patient Information dialog box appears.
-
Select a value in the Status dropdown:
Non-Patient – the selected family member isn’t a patient of the practice but other family members are
Inactive – the patient hasn’t responded to reactivation efforts
Archived – the patient will not be coming back - Click OK to save changes in the Patient Information dialog box.
- Respond to any messages asking you to confirm the patient status change.

Dentrix provides an option to delete patient records, but we recommend it only be used to correct a mistake.
For additional information on finding and following up on inactive patients, see the Contacting Inactive Patients topic in the #DentrixTipTuesday blog spot.
Author: Joel Baldwin, Curriculum Development Supervisor
Published: 09/30/2016

 Contact Us
 Phone:
  Email
Email Request Demo