Manage Documents with Dentrix Document Center
The Dentrix Document Center, when used correctly and consistently, can help your practice take a huge step in the direction of becoming paperless. Storing documents that you previously kept paper copies of, such as EOBs, patient health histories, X-rays or patient or referral correspondence, within the Document Center not only saves filing cabinet space in your office, but makes accessing the documents at a later time a whole lot easier.
Prior to using the Document Center, if you received an EOB in the mail from an insurance company, you probably made a copy of it and filed it with all patients listed in the EOB, as well as with the insurance company from which it was received. The Document Center allows you to do these same steps—only without paper or copies. You can scan the EOB into the Document Center and then attach it to the relevant sources (patients, providers, insurance carriers, etc.).
When you scan paper documents into the Document Center, they are stored as Unfiled documents. Unfiled documents are not attached to patients or providers until you assign them to a source. From the Document Center Unfiled Documents dialog box in Dentrix, you can edit document information to attach a document to a source, ensuring that the document is “filed away” in the appropriate location within the Document Center. For example, if you scanned a batch of EOBs into the Document Center, you would want to attach each EOB to the appropriate patients or insurance carriers and enter Document Information to assign a document type, description, and note to the document.
To attach an unfiled document to a source:
-
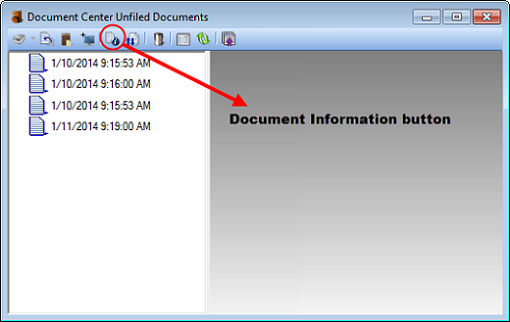
In the Document Center, click the Unfiled Documents button. The Document Center Unfiled Documents window appears.

-
Select the document to be attached to a source.
Note: Documents in the Unfiled Documents window are arranged by the date/time they were acquired by the Document Center. You can click on a document to preview it, to be sure that you select the correct document before you modify it.
-
Click Document Information button. The Document Information dialog box appears.
-
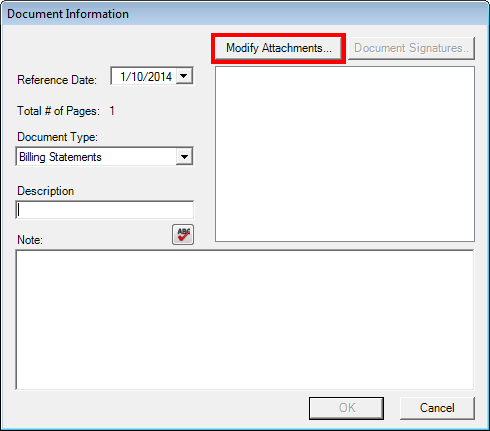
Click the Modify Attachments button. The Modify Document Attachments dialog box appears.
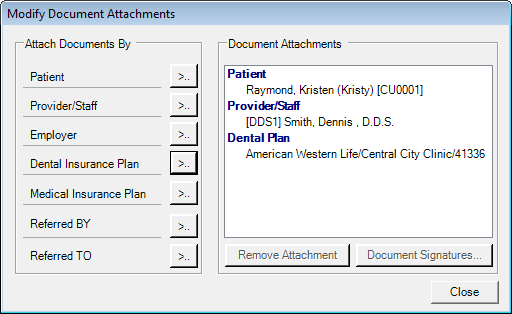
- Click the search button next to the type of source to which you’ll be attaching the document.
-
Select the appropriate source. (Repeat for all other sources if the document should be attached to multiple sources.) Then click Close to return to the Document Information dialog box.
Note: Certain documents, such as insurance EOBs, insurance coverage documents or lab case invoices, may apply to more than one source. The Modify Attachments option allows you to attach a single document to multiple sources. Once attached, the document will display in the Document Center for each individual source. - Assign the document a Document Type.
- Type a Description for the document.
-
Add a Note, if desired.
Note: If you’re attaching a single document to multiple sources, the Document Information you enter will be assigned to all sources. The Document Type, Description and Note should apply to all the sources attached to the document. - Click OK. You are returned to the Unfiled Documents window. The attached document is no longer listed.


Working to keep your Unfiled Documents window manageable is a worthwhile goal. Set time each day to make sure that Unfiled Documents are assigned to sources and organized so that you have access to them when you need them.
For more information about managing unfiled documents, see the “Entering document information,” “Modifying document attachments” and “Editing document information” topics in the Dentrix Help.
Author: Sean Eyring
Published: 02/28/2014

 Contact Us
 Phone:
  Email
Email Request Demo