Medical Cross Coding
In order for the medical cross-coding feature to work properly, certain steps must be taken to link the ADA codes to the AMA codes. For each ADA code, you must mark it for medical cross coding and then add the desired AMA CPT codes. For legal reasons, the AMA CPT codes are not included in DENTRIX, but can be purchased on a separate disk.
Please note that the AMA CPT codes on disk are for convenience in locating needed codes. Medical Cross Coding can be set up and used without the disk installation by referencing other resources readily available on the Internet and/or from documentation your office may already have on hand and then simply entering those codes and definitions through setup in Dentrix Enterprise.
If your office would like to purchase the Medical Cross Coding Pack, please contact our sales department at 1-800-DSCHEIN.
To setup codes to be sent on medical claims- From the Central clinic, log in to the Office Manager. From the Maintenance menu, point to Practice Setup, and then click Procedure Code Setup.
- Select the procedure that you would like to cross code, and then click Edit.
- Select the Flag for Medical Cross Coding check box.
- Click Close and then Yes on the message that asks you to save your changes.
- In the Office Manager, from the Maintenance menu, point to Practice Setup, and then click Medical Cross Coding Setup.
- Select the category and ADA code for the procedure that you selected in step #2.
- Select the AMA CPT code that corresponds to the ADA code, and then click Add to move the procedure to the Included AMA-CPT Codes for ADA-CDT Codes box. This allows you to easily attach that AMA code to the medical claim in a patient's Ledger.
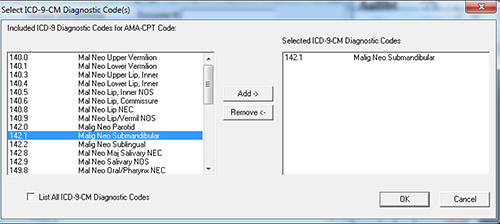
- Click the AMA-CPT to ICD-9 Diagnostic Cross Coding tab.
- Select the AMA CPT code that needs to be on a medical claim. Under Available ICD-9 Diagnostic, select the diagnostic code that also needs to be on a medical claim, and then click Add.
- Click Close and then Yes on the message that asks you to save your changes.


To set up the medical claim format
- From the Central clinic, log in to the Office Manager. From the Maintenance menu, point to Practice Setup, and then click Definitions.
- Under Definition Type (or Practice Definitions), scroll down the list, and then select Claim Format.
- Under Definition Text, there are two fields: one for a claim format and one for an abbreviation. In both fields, type HCFA.
- Click Add, and then click Close.

After the medical cross coding is set up, symbols will appear in the Ledger to alert the office if a procedure has been flagged for cross coding. Depending on whether or not the procedure has actually been cross-coded, and whether or not the patient is set up with medical insurance in the Family File, the symbol will appear slightly different. This lets the office know what steps to take next regarding this procedure, and if medical insurance will be billed when claims are created.
If a patient has medical insurance, this insurance will be billed first for cross-coded procedures. One reason for this is that there are no maximum benefits for medical insurance, and frequently there is no deductible. By creating a medical claim first, Dentrix Enterprise allows the office to take advantage of these conditions. Additional medical claim formats are available in the program and can be attached to the medical insurance information in the Family File once they have been set up in the Practice Definitions from the Office Manager.
To create a medical claim- Enter the patient's medical insurance carrier in his or her Family File. In the Family File, double-click the Insurance block, click the Medical Insurance tab, and then enter the insurance information.
- With the Insurance Information dialog box still open on the Medical Insurance tab, click Insurance Data. In the Claim Format field, select *HCFA. Then, click OK and then OK to save the changes.
- Open the patient's Ledger. After posting the procedure that has been cross-coded, you will see a hollow blue triangle on the Ledger entry. This means that the ADA code is ready to be cross-coded.
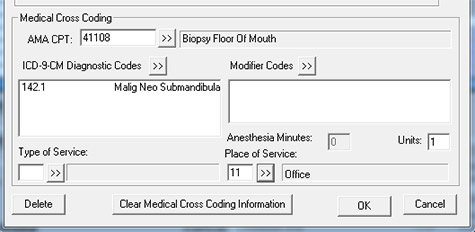
- Double-click the procedure you just posted in the Ledger.
- On the bottom half of the dialog box, click the double arrow (>>) button next to AMA CPT, select an AMA code, and then click OK.
- Click the double arrow (>>) button next to ICD-9-CM Diagnostic Codes, select the code, and then click OK.
- Do the same for Type of Service, Place of Service, and Modifier Codes (if necessary).
- Click OK.
- The hollow triangle is now filled in, meaning that the procedure has been cross-coded.
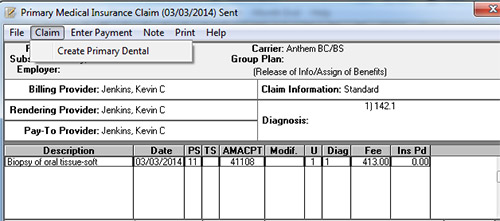
- Select the procedure, and create an insurance claim. A medical claim then appears on the Ledger.
*Please note that HCFA claims are “fill-in-the blanks” (pre-printed) claim forms that must be purchased from a supplier and placed in the printer for printing, unlike dental claim formats from Dentrix Enterprise that completely print with lines and boxes. - Double-click the medical claim, and then, from the Claim menu, click Create Primary Dental. Also, click Create Secondary (if necessary). All claims can be printed directly or sent to the batch processor for printing in mass, or for electronic processing.


To access other helpful articles go to the Dentrix Resource Center.
Author:
Published: 05/31/2014

 Contact Us
 Phone:
  Email
Email Request Demo