Confirm Appointments via Text Message Replies
Sending text messages is a quick and easy way to communicate with patients about their upcoming appointments. It takes a lot less time to send a text message than it does to call a patient, wait for them pick up the phone, remind them of their appointment or leave them a voicemail message and then put them on a list to call back if you don’t get an answer.
eCentral allows you to send automatic text message appointment reminders to patients. With the new two-way SMS feature, patients can now respond to the text messages you send. When patients respond to the appointment reminders via text, their appointment statuses are automatically updated in the Appointment Book. With a quick glance, you can see which patients have already confirmed their appointments and which still need an outgoing confirmation call.
In order to use the new two-way SMS feature, you need an eCentral Communication Manager account. You also need to download and install eSync, which transfers the information from eCentral to Dentrix. To download eSync, visit www.dentrix.com/products/eservices/esync.
Once you have installed eSync, you need to set up the Appointment Status you want to display in Dentrix when a patient confirms an appointment via text message. Follow the steps below to set up confirmation statuses in eSync, or go to www.dentrix.com/getting-started/text-message to view a video of the steps.
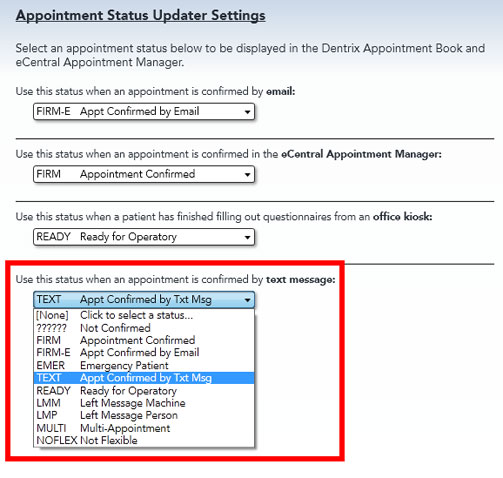
- In eSync, click the Settings icon at the top of the screen and then click Appointment Status from the list of available plug-ins on the left.
- From the drop-down list, select the appointment status options you want to use when an appointment is confirmed by text message. The available status options match those that have been set up in the Dentrix Office Manager.
To add, change or delete Appointment Status options in the Office Manager:
- Select Maintenance > Practice Setup > Definitions. The Practice Definitions dialog box appears.
- Select Appointment Status from the Definition Type drop-down list. The current list of appointment statuses appears.
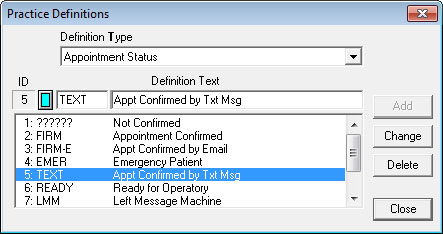
- You can make any of the following changes:
- Change – To change an appointment status, select the status to be changed, replace the abbreviation in the first field and the existing description with a new definition in the second field. Click Change to save.
- Add – To add a new appointment status, enter an abbreviation for the status in the first field and a description in the second field. Click Add to save the new status. Note: You cannot have more than 10 appointment status options. If there are already 10 statuses, you must change one of the options following the steps above.
- Delete – To delete the selected appointment status, click Delete. Note: If statuses are being used, you must choose a replacement status to be used instead of the one you delete.
Because patients are able to respond to text message reminders and their appointment statuses are automatically updated in the Appointment Book, you can spend less time making reminder calls and more time caring for your patients.
To learn more about setting up and using text message appointment reminders, go to the Dentrix Resource Center.
For step-by-step instructions on how to download eSync. You can also download and print the eSync Installation Guide from that page.
Author: Sean Eyring
Published: 09/30/2011

 Contact Us
 Phone:
  Email
Email Request Demo